Overview
Stages help you structure the customer lifecycle for your accounts and contacts. Rather than relying solely on opportunity-based tracking, stages give you a flexible way to reflect where a record stands - from first touch to closed customer and beyond. You can configure stage names, order, and colors to match your team’s process, then track and update stages directly from list views and record detail pages.Watch: Account & Contact Stages in action
Prerequisites
Admin access is required to configure stages in Settings.
- Stages are configured independently for Contacts and Accounts.
Setting Up Stages
Stages are managed per object type under Settings.Contact Stages
- Go to Settings → Contacts.
-
Select the Stages tab.

-
From here you can:
-
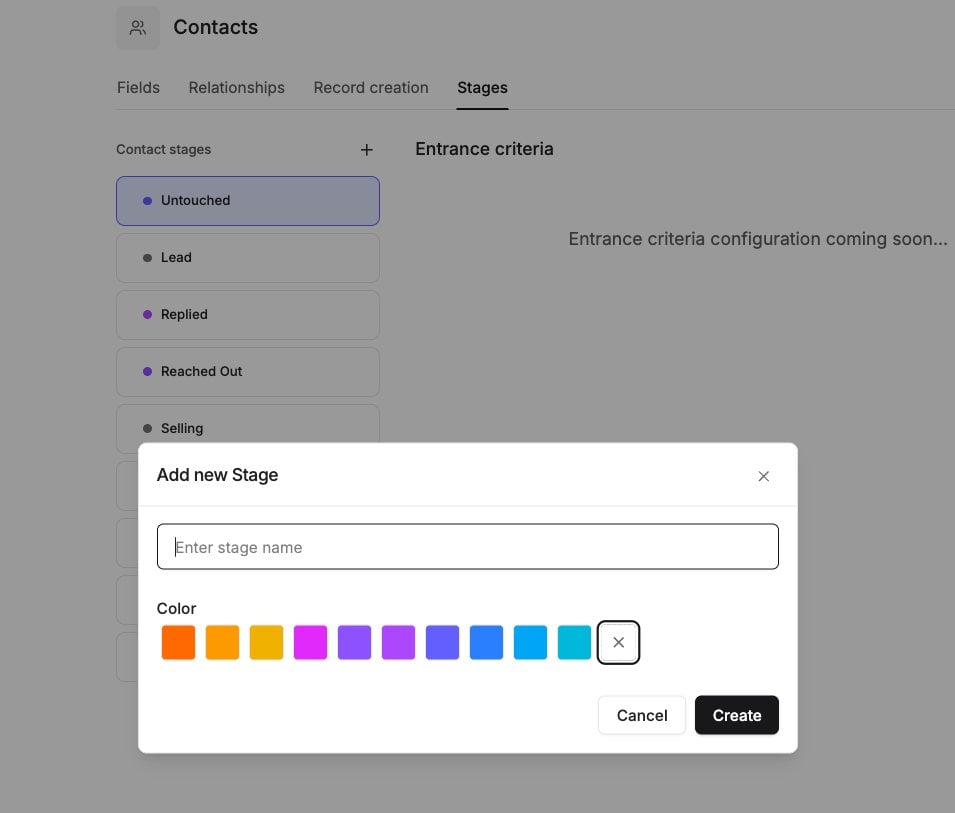
Add a stage - click Add new stage and enter a name.
-
Rename a stage - click the stage name to edit it inline.

-
Reorder stages - drag and drop stages into your preferred order. The order here is reflected in the stage stepper on record detail pages.

-
Assign a color - click the color swatch next to a stage to choose from the available palette.

-
Delete a stage - click the delete icon. If any contacts are currently on that stage, you’ll be shown how many records will be affected and prompted to remap them to a different stage before confirming.


-
Add a stage - click Add new stage and enter a name.
Account Stages
- Go to Settings → Accounts.
-
Select the Stages tab.

- Follow the same steps as above.
Using Stages on List Pages
Once stages are configured, a Stage column appears on the Contacts and Accounts list pages.
-
Filter by stage - use the Stage filter to narrow the list to records in a specific stage or set of stages.

-
Sort by stage - click the Stage column header to sort records by their current stage.

-
Update a stage inline - click the stage cell for any record to open a selector and choose a new stage without leaving the list.

Using Stages on Record Detail Pages
On any Contact or Account detail page, stages appear in three places:- Stage badge - displayed in the top bar of the record, giving you an at-a-glance view of the current stage.
- Stage stepper - a horizontal progress bar shown above the summary section. It displays all configured stages in order. Stages before the current one appear highlighted (completed); the current stage is marked as active; stages ahead are shown as upcoming.
- Stage as a Summary field (optional) - if you want stage to appear as a row inside the Summary card alongside fields like Account name and Status, click the cog icon on the Summary section, choose Add summary fields, search for “Stage,” and select it. This is in addition to the always-on badge and stepper above.
On Account records, the stage stepper only appears once at least one Account stage has been configured.

To transition a record to a different stage
- Open the record detail page.
- Locate the stage stepper above the summary section.
-
Click the stage you want to move the record to.

If the stage you pick has entrance criteria the record doesn’t meet, the move can be blocked. See What happens when a move is blocked.
Stage Entrance Criteria
Entrance criteria (also called entry criteria) are conditions a record must meet before it can move into a stage, such as a field that must be filled in. Each Account and Contact stage can have its own criteria.Only admins can add, edit, or remove entrance criteria.
To add entrance criteria to a stage
- Go to Settings → Accounts or Settings → Contacts and select the Stages tab.
- Select the stage. Its entrance criteria panel opens.
- Click Add criteria and define the condition.
- Mark each criterion as Required or Optional:
- Required criteria can block the move, depending on your stage enforcement settings.
- Optional criteria never block. If they aren’t met, the stage still changes and the user is told which ones were missed.
Entrance criteria don’t apply to the first stage. New records are placed in the first stage automatically. Creating a record with an initial stage also skips criteria; criteria only apply when a record’s stage changes.
Stage Enforcement
A stage can change in many ways besides the record page: bulk edit, CSV import, automations, and CRM syncs. The Stage enforcement tab, next to Stages, controls what happens on each of those surfaces when a record moves to a stage without meeting its required criteria. Each surface uses one of three modes:
Surfaces are grouped into two sections:
To set enforcement for each surface
- Go to Settings → Accounts → Stage enforcement or Settings → Contacts → Stage enforcement.
- Choose Off, Warn, or Block for each surface, or use a section’s Set all menu to apply one mode to every surface in it.
- Click Save changes. Until you save, your edits are a draft, and Discard undoes them.
Every surface defaults to Block until you change it. The record page always blocks a move when a required criterion isn’t met, so it doesn’t appear on this tab. Non-admins can view these settings but can’t change them.
What Happens When a Move Is Blocked
On a record page or list
A Stage criteria not met checklist opens and lists each criterion the record is missing. You can fill in the missing fields right in the checklist, then click Move to stage. Admins also see Move anyway, which overrides the criteria and moves the record. If only optional criteria are unmet, the stage changes and a toast tells you how many criteria weren’t met.On other surfaces
When a surface is set to Block, a refused move tells you why instead of failing silently:Troubleshooting / FAQs
Can I use stages in Workflow automations?
Can I use stages in Workflow automations?
Yes. Stages are supported as triggers and actions in Workflow Builder. You can automate stage transitions or kick off workflows when a record’s stage changes.
Are there any rules that block a stage transition?
Are there any rules that block a stage transition?
Yes. If a stage has required entrance criteria the record doesn’t meet, the move is blocked on the record page. On other surfaces it depends on the mode set in Stage enforcement. See Stage Enforcement.
Can I let a rep skip a required criterion on the record page?
Can I let a rep skip a required criterion on the record page?
No. The record page always blocks on an unmet required criterion. To make a criterion skippable, mark it Optional on the Stages tab. Admins can still use Move anyway to override a blocked move.
Why didn't my Salesforce or HubSpot sync update a record's stage?
Why didn't my Salesforce or HubSpot sync update a record's stage?
The record likely doesn’t meet the new stage’s required entrance criteria and the sync is set to Block. The stage field is dropped for that record and the issue appears in Sync health. Fill in the missing fields, or change the sync’s mode on the Stage enforcement tab.
What happens if I delete a stage that contacts or accounts are currently on?
What happens if I delete a stage that contacts or accounts are currently on?
Reevo will show you how many records are affected before you confirm the deletion. You’ll be prompted to remap those records to a different stage first.
Are Contact stages and Account stages the same list?
Are Contact stages and Account stages the same list?
No - they are configured independently. Changes to Contact stages have no effect on Account stages, and vice versa.
Is there a limit to how many stages I can create?
Is there a limit to how many stages I can create?
There is no set limit. We recommend keeping the list focused to stages your team actively uses.